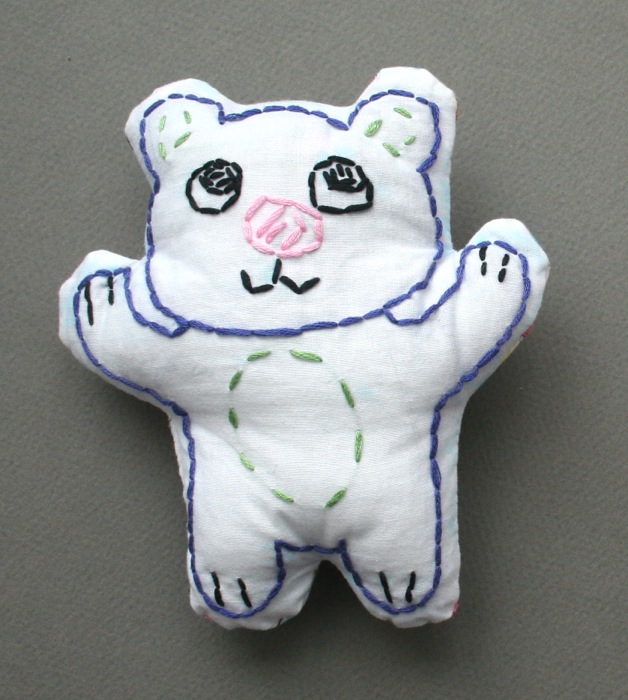
Friday, January 11, 2013

Thing 1's woodland critters

This is Stitches.

 This is Buttons.

My 10 year old created these two softies using the embroidery book and sewing kit gifted to her by Miss Robyn and of course I must feature them too.

I invited Thing 1 to write this post also, but she became very quiet as I sat expectantly with fingers poised above the keys. Then she suggested no text, just pictures. Too much pressure.


Here are the backs. Thank you again to Beth for the very appropriate Stampin' Up fat quarter she used for Buttons. She zeroed right in on it.


Her preliminary sketch. She informed me these two are the first of five softies in a series she has designed, dubbed 'Woodland Critters'. How 'bout that.

I had to be all casual and smooth about it, because if I get excited or too involved it kills it for her. I don't want to be the crafting equivalent of a stage mommy: "Put down that silly book! Have you practiced your french knots today? You KNOW the Mother Daughter Pan Gran Embroidery Regionals are coming up! SMILE as you thread and no squinting! SMILE! Show me the sparkle!"

Wednesday, January 9, 2013

Thing 2's spongebob in felt

 Spongebob

 
 Sandy Cheeks

 Mr Krabs

 Karen

Plankton

 Patrick

The whole gang.

Made by the eight year old during Christmas break. It was a surprise attack by her creative muse. She'd been pining for a set of Spongebob beanies for Christmas, then she just decided suddenly that she wanted to make them instead of waiting. So she just did it.

Spongebob was first. I made a few suggestions and helped her sew a couple of things and showed her how to stuff him. Then she decided that the whole sewing thing was just slowing her down, so she disappeared with a tray of felt, scissors and glue and made the rest of them.

Then she asked me to feature them on my blog. Heck yeah, I'll do that.

 Mr Krabs' nose

I find it very refreshing that for her there was no planning or tracing or pattern making. She just cut them all out freehand and slapped them together and then very happily played with them after they were done. Total focus, quick follow-through and then satisfaction in her project.

Mommy could learn a thing or two from that.

Monday, January 7, 2013

handmade gifts 2012, part 3


The last handmade gift is a reprise of the Phil 4:6-7 papercut I made for Robyn a while back. This version is for my sister, Leigh.

It fits an 8 x 10 inch frame. I changed it a bit from Robyn's with more leaves and no birds included. I included several background colors with it so she could switch it up and find one that worked best for her decor.


I gifted it to her along with a pillow cover you see folded and tied above that I made from some Crate & Barrel napkins. I forgot to take a picture of it on an actual pillow. Oops. It's a nice, Christmasy array of bold green stripes. I made it in my favorite, quick no-zipper-required envelope method, which took three napkins. Also no hemming, since the edges of the napkins are finished already. Boom.

In addition to those I gave some Rifle Paper Co. notes and the Penguin Classic edition of Cranford, in honor of the afternoons we spent watching the mini-series together and drinking tea. The scene about the oranges. Oh my word. "We will repair to our rooms... and consume our fruit in solitude." So funny. The book is a wonderful read, too.

That wraps up the making for Christmas. I had pie-in-the-sky visions of making the quilts for the girls, but I've set my sights on Valentines for that. Which is probably just as unrealistic. Oh, I did have one more handmade gift besides these, but you've already seen the photos. I made a gift of these two stockings to my lovely sister Lori along with some books. She's a book addict like me.

Saturday, January 5, 2013

handmade gifts 2012, part 2


For my nephew, Michael, who will be getting his own place soon. Presumably on Tatooine. I designed the coffee mug in Illustrator and produced it via Zazzle. I'm counting it as handmade even though I didn't technically make the mug. It was shipped so promptly and turned out just great, but of course I forgot to take a picture of the real mug. Blast!

These photos are from Zazzle's project preview, which is amazingly accurate. I've made a few things on Zazzle over the last few years and I'm always pleased with the result.


This quickly made light/dark switch plate was a last-minute addition. It was inspired by some really funny ones I've seen around the web. All it takes to DIY is a Sharpie and The Force. Ok, just a Sharpie.

Also included a bar of both white and dark chocolate in the package labeled as Luke and Vader's faves. Belabor the theme, I did.

Friday, January 4, 2013

replies to your comments

I recently enabled the threaded comments feature on blogger (sorry, WAY overdue). I read every single comment and if you have a question I always try to give an answer. I reply within the comments to questions because that saves time for those who have the same question as they scroll through. If you would like an email response to your comment or question, be sure to click the 'subscribe by email' link that is visible underneath the comment field before you publish your comment. It's just one click, there's no hassle involved or any additional thing to fill out. When you do that, my response will be on the blog as well as emailed directly to you. Thanks as always for your comments and questions!

Thursday, January 3, 2013

handmade gifts 2012, part 1


We draw names on my side of the family for Christmas. That means each member of my own family will get a gift for another member of the extended family. So, basically I had four gifts to take care of for our swap. I have never attempted a completely handmade Christmas. Way too overwhelming. I bow low to those of you who manage it! But I did try to include handmade elements with each name draw gift.

Even though I was struggling to get along with the new Cameo, I did manage to produce the papercut card sets you see above for my niece. She's the busy mommy of two toddlers, so I figured having nice cards handy would save a trip to the store. I designed both these cards a while back, here and here. Instead of cutting them by hand for multiples, I converted the files to DXF for the plotter. Yada yada. And they were done.

After they were assembled, I tied a couple of stacks together with envelopes and pretty ribbon. During the yada yada there were moments when I thought I could have cut each by hand and had them done faster. It was a learning experience but
1) I was very pleased with the cards I did manage to make and
2)
now I have Much Knowledge.
To be fair, most folks probably don't get their Cameo out of the box and start importing their own custom cut files. I kinda skipped the whole crawl before you walk part.

I raided my awesome paper tower to produce a variety in eye-popping colors. Have I mentioned how much I love and adore my cheap, plastic paper tower? I have? Oh.


Sorry for the gloomy photos. It looked like a nuclear winter here for the last half of December. My new replacement blades have arrived promptly from Silhouette America, so I'm looking forward to giving this another try and seeing if the fine cuts/points/corners come out cleaner.