Monday, December 31, 2012

goodbye, 2012.


It was a good year.

Monday, December 17, 2012

blue bird of happiness


I could certainly use a little happiness and hope after the last few days in America. I'm sorrowing for the families in Connecticut and hugging my own kids more tightly.

Thursday, December 13, 2012

hey, Larissa, do you have any tips to improve my cutting skills?


Why, yesh, I do. Twelve of them.

First of all, have the right tool for the job at hand. There's more about that in this post.

So let's assume you have the correct scissors in hand for what you are cutting. Here are some tips for excellence in scissor craft! I sound a bit like Dolores Umbridge when I say that.

First a few prep-work tips:

1) Seems a no-brainer but seriously, have some good light on hand. Daylight is the ideal, but of course many of us have to wait until evening to make stuff because of the small (or big) people at our house who expect to be cared for, fed, educated, played with, etc... Good task lighting is a huge help.

2) If you are tracing a shape to cut out, it is important to trace with a thin, precision line. For instance, cutting along a line made with a fine point pencil will give a better result than cutting along a fat marker line.

3) Getting a nice sharp line on felt or fabric is sometimes a challenge. Whenever possible, I trace the shape on the wrong side so I can use a permanent thin marker/gel pen that is clearly visible and won't disappear or bleed. As much as I love the disappearing purple markers, the lines fade quickly, so I only use them when I need to. I avoid using the blue water soluble markers, because even though they don't fade, which is nice, you have to blot with water to get rid of them and that adds an extra step. Fine point chalk pencils and markers are a nice option for tracing on darker colors and the chalk brushes off. (Never trace on the right side of the felt/fabric with a permanent pen or marker, because even after cutting it will leave unsightly inky bits on the edge of your shape.)

4) Another great way to accurately cut a shape on fabric or felt* is to use freezer paper.
*I mean wool felt. Don't try this with acrylic felt - 1) it might melt 2) freezer paper doesn't stick to it very well.

First, trace the shape on the dull side of freezer paper. Iron it shiny side down to the right side of the felt/fabric.

Then carefully cut around your traced outline.

  After you are done cutting, the freezer paper peels off easily. It leaves no trace and your shape will have a nice clean edge.

Now some tips for the actual cutting part:

5) For a clean, controlled cut, you must constantly maintain a good tension between the blades of the scissors. My kids can't grasp that part. (ha ha. Punny.) They saw up and down with the scissors handles but their hand stays too limp and their cuts are not clean. Maybe it was the fact that I had a lot of dull scissors growing up, but I figured out pretty early that my cutting hand should always be doing this:

It basically feels like your hand is cramped as you hold the scissors. My thumb is pushing its scissors handle away and my fingers are pulling their handle in towards my palm. Keeping that tension will press the scissor blades against each other and will help you maintain control and get a clean edge every time.

6) If the scissors are in your right hand, your left hand will actually be doing most of the finesse work. Did you hear that? That's right. The hand that is not holding the scissors is the key to neat, accurate cutting. Think of your scissors hand as the brawn, and your free hand as the brains of the operation. As you cut, keep your scissors hand cutting away from you without turning. Your other hand should be busy rotating the paper (or felt) in a smooth motion to meet the blades of the scissors. The smoother this motion is, the better your cutting will be. Vary the speeds you rotate to maintain accuracy. For instance, the tighter the curve is, the slower your free hand will be rotating the paper.


7) On larger shapes, start each cut with your scissors opened wide. That way you don't have to open them back up a lot and you can get longer, more fluid looking cuts.

8) Don't attempt to cut out a complex shape all the way around in one direction, without repositioning the scissors. Most things I cut out are cut from all kinds of different approaches in order to get the very best result. I save the tricky parts for last, repositioning my scissors to get the best angle at each part.

9) If you want cleanly cut interior angles, you can't cut down into the angle then back out of it. The best way to tackle those is to go down one side and end the cut on the point, being careful not to cut beyond the point. Then reposition and cut down the other side, slowly cutting toward the point until the wedge of paper falls away and you have a perfectly clean interior point. Don't be tempted to cut almost to the point, then pluck the wedge of paper out by hand. That just leaves an untidy hanging chad. Which are bad during elections and also in paper cutting.


10) Don't cut directly towards a rounded shape at a right angle. Cut obliquely towards it instead, so that you come in at a shallow angle and go on from there.


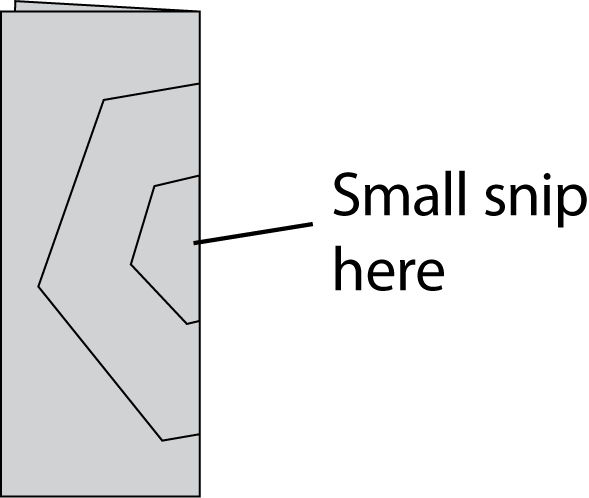
11) If the shape you are cutting has interior pieces to cut out (like the inside counter of the letter A or a donut hole), you'd typically want to cut those first before you cut the outer line. On paper and sometimes wool felt this is best done using an Xacto knife on a cutting mat. This method works best on wool felt if the cutout is small.


For fabric or larger pieces of felt, I use scissors. To cut out an interior shape with scissors, fold the fabric/felt together so the cut away area is on the fold. Make a snip with your scissors. Unfold and insert the scissors blade in the hole and cut your way toward the line of the interior shape, going on from there.


12) To get a nice continous zig zag or scallop pattern when cutting with pinking or scallop shears, there're a couple of things to watch for. Never completely close the shears as you are cutting as this sometimes adds a deeper cut at the end. Also, when you reopen the shears to continue, be careful to reseat the opened scissors with a scallop (or point) inside the last one you cut before you continue. This will prevent getting half scallops and half points, which detract from the uniform look.


So those are a few of the methods I used to get nice, clean edges and accurate cutting by hand. I hope they are helpful to you!

Thursday, December 6, 2012

hey, Larissa, what do you use to cut felt (and fabric)?

You can thank mmmaker Maggie for this post. She asked me yesterday what tool I use to cut felt and then I wrote a novel back to her and she kindly suggested I use it for a blog post. I think yes.

So what do I cut stuff with?


1) GINGHER DRESSMAKING SHEARS
For cutting larger pieces of woven fabrics or felts you just can't beat a good pair of Gingher dressmaking shears. Period. They've made cameo appearances in many of my sewing tutorials as shown below:


They are weighty, feel great in your hand, and make a very satisfying *swack* as they close. The *swack* indicates that they Mean Business. Also they are very shiny and pretty, so. Bonus.

I've had this pair since 2000 and had them sharpened only once. (There's a whole story there where I think my sister 'accidentally' switched my new Ginghers with her older ones when she was visiting, but it would be petty to mention it. Again.) The entire length of the blade delivers a clean cut right down to the very (sharp) tips, so it makes cutting interior acute angles and clipping seam allowances a breeze. They don't come cheap, they run about $30ish from various places (save your coupons), but if you work with fabric or felt they are a must-have.

BTW, never, never, never use your Gingher shears on paper. Paper will quickly dull the blades and their magical properties will be lost. Hide them away from grabby children and their construction paper projects.


2) SMALL, SHARP DETAIL SCISSORS
A shorter pair of scissors is needed for small scale detailed fabric/felt cutting (like for my ornaments) and I use the three pairs shown below constantly. They are my faves. The green and blue pair are both serrated Karen Kay Buckley scissors. So worth it. My sister gave me the green pair and then I bought the blue because I liked the green so well. The blades are super sharp to the very tips and make precision cuts a breeze. I also have worn out two pairs of the creme handled Martha Stewart precision scissors shown below. They seem to be discontinued but I see them sometimes if I do a google search. I use them a LOT so it's a shame they are no longer readily available. They are lightweight with comfortable rubberized handles. Crazy sharp all the way to the thin tips. They make it easy to cut tiny shapes and details. They come with a nice protective cap for the blade. (I confess I use the MS blades on paper too, but despite this abuse they still bite cleanly through felt.)

Green and blue serrated ones are here
 
 
Discontinued? Looks that way. :-(

That's always what happens to my lipstick color too. I find one I like and then whamm-o it's gone forever.


3) X-ACTO KNIFE
Normally used for cuts on paper, this handy craft knife also makes quick work of cutting small interior shapes cleanly out of felt (like the windows on my All Through The House ornament). For straight cuts I use a nice new blade alongside a plastic quilt ruler. Curved cuts are best done with multiple tiny straight cuts as opposed to dragging the blade across the felt in one motion.


4) ROTARY CUTTER
If it's a long, straight cut on fabric or felt I use my Olfa rotary cutter and a ruler on a cutting mat. You get a much cleaner cut than with scissors and quicker too. Unlike most folks, I prefer to use a metal ruler as opposed to plastic. I've actually shaved off the edge of a couple of my plastic rulers with the blade. Oopsie. 

(Note: if you use a metal ruler, which is thinner than plastic rulers, you need to be super careful to seat the blade firmly and go slowly so you don't jump the edge and cut your fingers! When in doubt, use plastic – it's better to shave your ruler than your fingers.)


5) SCALLOP AND PINKING SHEARS
Now for decorative edges. I have two kinds of shears for that, scalloped and pinking.


Pinking shears (pointy teeth) are widely available. I picked up mine at my local fabric store. Sorry, I can't find a brand name on them. Benzie Design sells a nice pair. They power through several layers of fabric when needed and cutting felt is a cinch. Pinking shears are a practical and quick way to finish a seam allowance so that it doesn't ravel, but also they are great for giving items a decorative zig-zagged edge.


Scalloped fabric shears are harder to find and they can be more expensive. I got my first pair via ToolTron forever ago and I've been very pleased with them. The brand name might be Nikken, it's really hard to tell because it's so tiny. They are marked "Made In Japan". I also now have two really nice new pairs of large and small scallop shears from Benzie Design, and you can find those here. It's so nice they have three scallop sizes to choose from!


NOTE: Please do not confuse good pinking and scallop shears with similar looking paper edging scissors. 100% NOT the same. Attempt to use paper edgers on fabric or felt and they will make a big ol' hash of your project.


6) REGULAR OL' CHEAP SCISSORS
Of course, I also have myriad pairs of cheap IKEA scissors laying around for cutting out freezer paper, ribbons, rough cutting card stock... It's great to keep several pairs of cheapies within easy reach so you are not tempted to pick up your expensive Ginghers or detail scissors to cut a pipe cleaner or slit open a package. Horrors!

That's the 411 on my fancy fabric cuttin' tools. If neat, precision cutting matters to you, having the right tools will help you get there. Good hand cutting skills are also essential. That sounds like another post.

Sunday, December 2, 2012

speaking of not having enough time in December...


I just found this felt bird ornament that was half finished from last year in my stuff. Oops. Remember when I crashed your craft party last December, Robyn? That was fun. The soup! The laughing! The busy makery around your table! Being jealous of your iron! Good times. Good times.

Poor forgotten bird. I'm going to finish sewing him up and get him on the tree. Hmm, he needs some dark blue on his very very red head, doesn't he?


If folks would like to see more of the Christmas crafts I've made over my blogging years, I've rounded them up for you in this aptly named set on flickr.